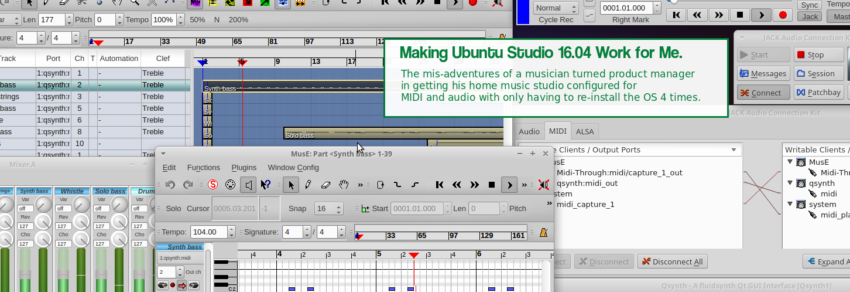
So you’ve installed Ubuntu Studio 16.04 on one of your aging laptops in hopes of realizing your long-lost dream of becoming a rock musician given up some years back to wrack up significant student loan debt earning a Bachelor’s degree in early 20th Century Russian Theater.
Congrats on the bold move there Konstantin Sergeyevich. Now what?
Here’s a novel thought, how about bending the will of your freshly installed operating system/multi-media authoring platform so it works for you?
Below is a somewhat lengthy list of customization and configurations I implemented to bring back to life my dormant MIDI studio, which I plan using as an accompaniment to put my own Bachelor’s degree in Vocal Pedagogy back to work. Well, that and some Machine Learning generated music via the Tensor-Flow driven Magenta Project.
I also plan on authoring some humorous how-to videos, and perhaps even podcasts on the topic of Lean, Agile, software product management … but I digress …
… what’s import is — my one big caveat — before you try what I’ve brain-dumped below, keep in mind that this programmer turned product manager did test the below steps a couple times, it also took four fresh re-installs of Ubuntu Studio before I got it all right.
Meaning, there’s no guarantee you won’t suffer a similar fate if you blindly follow along without at least creating one data backup.
Language Support & the Software Center
Imagine one’s frustration after successfully installing Ubuntu Studio 16.04 only to get the following message when opening the software center:
“No Application Data Found.”
Apparently, this is a result of the Language Support not enjoying a complete install. Fortunately, there’s a simple fix: navigate to the Whisker Menu available at the top left of your screen and type in “Language Support”.

You’ll likely get a prompt that its install wasn’t complete. If so, follow the prompts for English, Esperanto, Uralic, or whatever your preferred language of choice is to finish its install.
With a completed Language Support install, you should be able to get past the problem otherwise known as ‘The new software center in Ubuntu 16.04 shows no application data found.’
Notepadqq
Next on the list was to equip my platform with a text editor that was neither too wimpy nor too bloated. I wanted just enough of a text editor to help me get done light scripting and note-taking without having to relearn a bunch of new keystrokes and/or conventions.
Notepadqq is just such an editor, especially for those of coming out of a Windows background and familiar with Notepad++. Mac users may enjoy it too, though I suspect they’d more likely lean in the direction of Sublime Text.
And while I suppose one could install Notepadqq through their recently fixed Software Center — as you’ll find out in most of this article — I personally prefer the brutal efficiency of the Bash Shell. For example:
sudo add-apt-repository ppa:notepadqq-team/notepadqq
sudo apt-get update
sudo apt-get install notepadqq
The first command adds a new repository to your software center. The second and third commands, well I drop me a line if they don’t make sense.
Oh, and the second time out (of four), I got some error about PIP not being installed along the way. That can be resolved issuing:
sudo apt install python-pip
Yet More MIDI Tools
It’s not like Ubuntu Studio 16.04 is lame in the default packages it installs out-of-the-box, but sometimes you just want more cowbell.
Below are six tools, five of which I’m adding, one in which I’m ensuring is updated
sudo apt-get update
sudo apt-get install vmpk audacious songwrite buzztrax muse
sudo apt-get install qsynth
Here’s what y’all just installed:
- VMPK — Virtual MIDI Piano Keyboard is a MIDI events generator and receiver. Great for testing sounds, synths, and all the connections in between.
- Audacious — Audacious is a fork of beep-media-player which supports Winamp skins and many codecs.
- Songwrite — Songwrite is a guitar tablature (fingering notation) editor and player, quite similar to TablEdit. In addition to tablatures, it also supports staff, lyrics and drums.
- Buzztrax — Songs are made by adding virtual sound generators and effects, connecting them, recording short musical phrases and arranging them in the sequencer.
- MusE — There are a handful of decent sequencers out there, but since I heavily import and export MIDI files as part of my process, this is my preferred weapon of choice.
- Qsynth — This is FluidSynth GUI front-end application, and is my goto sound generator when I’m not hooked-up to an external sythesizer.
Making MusE Work
I quickly noticed that when I clicked on MusE from the Whisker menu, nothing happened. Then I tried running MusE from the command line, and got and error.
It didn’t take me long to find a post on the ‘libmuse_core.so: cannot open shared object file’ error I encountered.
Reading and attempting a workaround — and after opting NOT to implement solutions recommended on a separate LinuxMusician’s BBS thread — I took the prior post’s recommended solution one step further. First, from the command line I typed in:
notepadqq ~/.profile
Once in my .profile via the notepadqq text editor, I appended to the very bottom the following.
# This should get MusE back in action
# read more about why this fix is important:
# https://help.ubuntu.com/community/UsingTheTerminal
export LD_LIBRARY_PATH=:/usr/lib/x86_64-linux-gnu/muse/modules:$LD_LIBRARY_PATH
(Note, the export statement above is all one line, despite what Medium.com’s formatting says)
Once you’ve saved the file and are back at the command line, you can restart your session through various acts of command line approaches.
Here’s the quick-n-dirty approach:
. $HOME/.profile
If you’re running the bash shell — and I suspect you are since that comes as default with Ubuntu Studio 16.04 — then the ‘more betterist’ way of adding this export path to your current session.
[ -f $HOME/.bashrc ] && . $HOME/.bashrc
Of course, you can always quickly log out and log back in, but you lose any ‘geek cred’ you may have earned by editing your .profile.
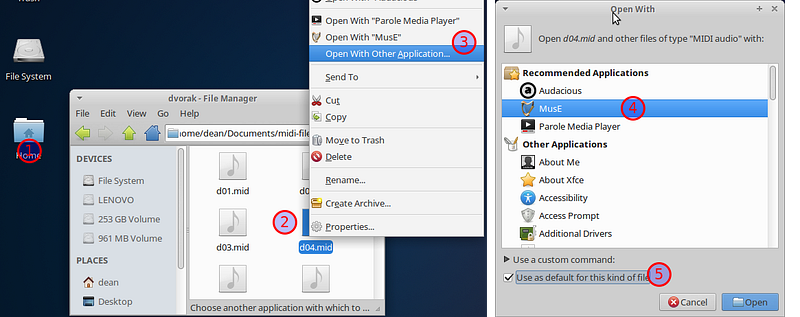
Regardless, after all this, MusE will work either from the menu, or the command line … or when I click on a .MID file … because I took the following Win7 like steps to make it my default MIDI file player:
- Clicked on the ‘Home’ filter on my desktop;
- Navigated to a .MID file and right clicked on it;
- Selected the ‘Open With Other Application’ from the right click menu;
- Selected ‘MusE’;
- Checked the box for ‘Use as default for this kind of file’ ;
- I then clicked ‘Open’.
SoundFont and Samples Fun
UbuntuStudio 16.04 comes with many sound file samples, along the FluidR3_GM.sf2 sound font, all located under the parent directory /usr/share/sounds.
Since I’ll likely be working with sounds, samples, and sound fonts, I opted to create a convenient symbolic link in my home directory to the shared sounds path.
cd $HOME
ln -s /usr/share/sounds/ sounds
QSynth, QJackctl and LMMS, Oh My!
Yes, I know, some of y’all are saying “Hey gramps, ~ is as good as $HOME, oh and by the way, symbolic links are evil!” Perhaps that’s why I used the actual path when I set up soundfonts for QSynth?
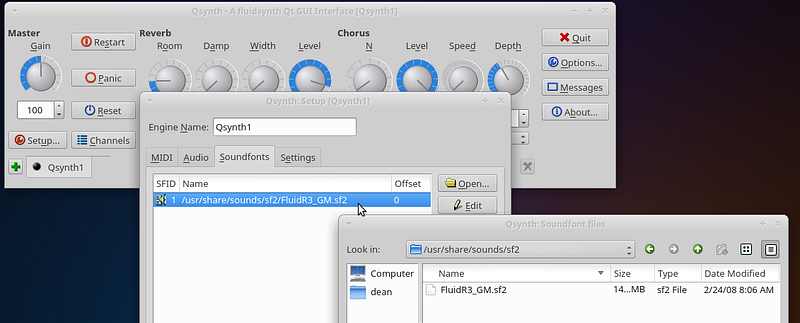
Either way, since I use QSynth heavily in combination with KMVK and QJackCtl, I took this opportunity to modify the MIDI Driver setting for QSynth to ‘jack’.
I then opened QJackCtl and changed MIDI Driver setting to ‘seq’.
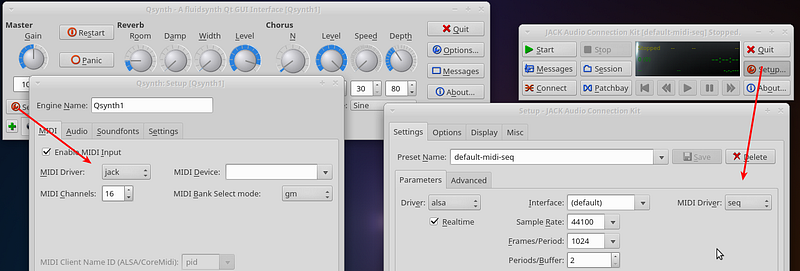
(Note, I’ll likely write more on this topic very soon, as many struggle with jack, synthesizers, and sequencers. For now, the above settings get things in place the way I like’m. Until then, there’s always the Ubuntu ‘Software Synthesis HowTo’ page.)
Also, this was a good time open up LMMS for the first time — for each of the four install attempts — and set the soundfont.
Driving the M-Audio MIDISport 2×2 USB MIDI interface(s)
Yeah, you read that <h2 /> header right, I’ve managed to land two M-Audio MIDISport 2×2 USB MIDI interfaces off of Craigslist. Both off moving sales, the second one came into my possession when the individual selling me their EMagic AMT8 had lost the power supply so they threw in a MIDISport as an incentive buy the 8 port unit untested.
And yes, all three units work fine … with one exception …
… the MIDISports need a little device driver love before UbuntuStudio recognizes it. Here’s all that took:
sudo apt-get install midisport-firmware
Like any of this stuff, there’s additional and copious details available here for those who want to go deep into the weeds before they down the rabbit hole.
LinuxBand and MMA
My next death-defying act of DevOps took me a couple tries, and a hosed operating system.
I wanted a Band-in-a-Box like experience, but really didn’t want to clobber my latency with a solution such as Wine or VMWare.
Instead, I landed on MMA Musical MIDI Accompaniment and an accompanying GUI front ent LinuxBand.
Both being a little dated, following the instructions to the letter didn’t turn out as well as I had hoped.
To get around this impediment, I opted to install LinuxBand first. Yeah, I know, that seems backwards, but it worked. What also worked was reading up on the topic a bit and determining some of the instructions on the how-to page — that hasn’t been updated since 2012 — required that I NOT install the following dependencies:
sudo apt-get install libjack0 # don’t do this!
sudo apt-get install libjack-dev
Instead, I opted NOT to break Jack and instead installed a more up-to-date dependency, followed by three others listed on the how-to page.
sudo apt-get install libglib2.0-dev
sudo apt-get install libjack-jackd2-dev
sudo apt-get install libsmf-dev
sudo apt-get install python-gtk2
sudo apt-get install python-gtksourceview2
At that point I was ready install the actual LinuxBand application as follows:
wget http://linuxband.org/assets/sources/linuxband-12.02.1.tar.gz
tar -zxvf linuxband-12.02.1.tar.gz
cd linuxband-12.02.1.tar
./configure
make
make install
You WILL get deprecation errors after the first make statement. They are non-fatal. The product manager in me says “Bah, move forward.” The former developer in me wants to fix them. Either way, it all worked.
The last step in this dance was to modify the configuration file for LinuxBand so my first outing would run a bit smoother.
mkdir ~/documents/mma-fun
notepadqq /usr/local/share/linuxband/linuxband.rc
Once in the editor, set the following variables
jack_transport = True
work_dir $HOME/documents/mma-fun
I did NOT run LinuxBand at this point, as it still requires MMA Musical MIDI Accompaniment. For that, there’s this:
sudo apt-get update
sudo apt-get install mma
Mugged by MenuLibre
There’s a pretty nasty bug dogging the menu editor menulibre that comes as part of the setup utility. Basically, when you add a new menu option to a directory such as ‘Audio Production’, you lose all the other menu options.
I found several grumpy threads on this topic, here’s just one:
It ends with advice to use the alternative alacarte, which in turn saved me a bit of grief when I wanted to add a ‘LinuxBand’ a menu option on my fourth UbuntuStudio install.
sudo apt-get install alacarte
whereis alacarte — copy the path (/usr/bin/alacarte)
alacarte&
At that point I added alacarte to my Systems menu, and then LinuxBand to my Audio Production -> MIDI Utilities directory (using a custom icon of my own choosing).

Shutter for Screen Shots
Having used Snagit for a few years now on other platforms, I wanted something a bit closer to that experience than the xfce4-screenshooter app that arrives with Ubuntu Studio 16.04.
After shopping about the Software Center reviews, and then reading a couple online articles, I settled on Shutter.
sudo update
sudo apt-get install shutter
When I was done running it through its paces, I decided I wanted to change the default behavior of my PrintScreen key to accommodate Shutter as follows:
- for the PrintScreen key, I replaced the original ‘xfce4-screenshooter -f’ with ‘shutter -s -c -e’ because I like to select by region (selection) by default.
- The Alt+Print went from ‘xfce4-screenshooter -w’ to ‘shutter -f -c -e’ for full screen captures.
- I added a Ctrl+Print option ‘shutter -w -c -e’ to capture individual windows.
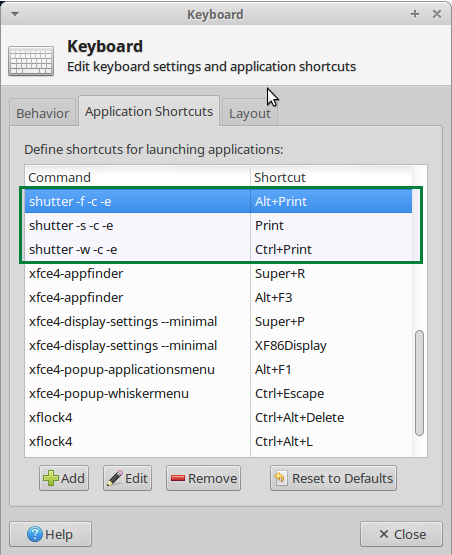
You can find the above Keyboard editor via the Whisker Menu.
Other Odds-n-Ends
First, while I like FireFox, I like Chrome, or in this case, Chromium better.
sudo apt-get install chromium-browser
Second, I plan on diving into some machine learning and natural language processing fun for music and content creation.
While I’m waiting for Google’s Magenta project to mature, I did go ahead and install the Natural Language Toolkit for some word smashing fun this coming Winter.
sudo apt install python-pip # optional , if installed try ‘pip install –upgrade pip’
sudo pip install -U nltk
sudo pip install -U numpy
To test the installation type in ‘python’ at the command prompt, then type in ‘import nltk’, where no error means all is well. You can take that one step further if you want and enter ‘nltk.download()’ if you’re read to ‘Dive into NLTK.’
Epilogue
In the end it all worked out, as you can see from this embedded Instagram video I hastily posted about a week ago from my phone and its crappy audio video capabilities:
- Working with MIDI files in MusE generated by MMA
- Dealing with external MIDI controllers and devices
- Combining the best of MIDI and Audio using Aurdor and Audacity
- Recording and Streaming a podcast via Ubuntu Studio
- Taking a shot at OpenShot Video Editor
- Bumbling my way through Blender
We’ll see how that works out, as I have other posts — and hopefully some humorous videos — on the topic of product management that need to get out.
All that said, I suspect there are those geekier than myself who may find some of my approaches or recommendations less than optimal. I’m cool with that, just post a comment so we can all learn and grow from the discussion starter above.
At least that’s my story, and I’m sticking with it until the data says otherwise.
